Wednesday, March 27, 2019

SharePoint 2013 , 2016 Or SharePoint Online Search Configuration (Part 1) - How to Managed Crawled Properties | Set Managed Properties & Property Mapping.

We all know that, How powerful the SharePoint search is. In fact, you could argue that's the prim driving factor, most of the clients going to the product.  However the question is, as a developer or a technical professional who works with SharePoint do you know exactly what you could do with that, how you can control the search, control the refinements control the keywords ,... etc.  or you, just like everyone else, knows the SharePoint search as something similar to google search.  basically it indicates how little you as a developer or an organization which using SharePoint knows about one of the most powerful feature of the framework

If you are a second type person this Article for you ..................

Why ....... ???

There was a requirement, to filter documents based on their meta data (Columns) by using the default SharePoint search. Eg. if a document library has  a column Called Customer or Bar-code ,.. etc, then User should be able to search as Customer:<Search text>, Search results appear ,only contain the <Search Text> words in the Customer Column not others. That's the basic Idea.

Before How ...... ??

In this Article I'm not going to cover the theories behind the SP search specially the new Search introduce from 2013 version, Including Content Sources, Crawl schedules Services and Typologies.

Will write an another Article to explain the mechanism behind the SP search where I'll cover above mentioned topics.


How........ ???

The most important factor to achieve the above requirement is the way you play with Term called "crawl properties"

Note: Crawled properties are generated automatically by SharePoint while crawling published content that has the corresponding fields populated. For example, in order to get a CrawledProperty for "MyColumn", you need to have at least one item that has a value in that column. After the next "Full Crawl", a Crawled Property for "MyColumn" will be created with a kind of Hungarian notation naming convention, typically something like "ows_MyColumn" or "ows_TEXT_MyColumn", etc. depending on the data type.

~ (https://sharepoint.stackexchange.com/questions/130712/crawled-properties-vs-managed-properties)

in Simple words, When indexer passes and crawls your content and its metadata it adds the columns as crawled properties only. This means it has passed over your columns and the metadata assigned to each element. You do not have any control over the creation of “Crawled Properties”.

Enough theories, Let's get into the business. 

Step 1 - Plan your Data layer ( library or list )

there are two main ways of creating a list of library, Either by creating it from the scratch using list columns or Create a list of library based on a Content type which consist or Site columns. 

We are going with second option since,  List columns cannot be bind with content type and cannot be used as a Crawl properties.

Create site columns.  go to the Site settings and Chose "Site Column" option under, Web Designer Galleries.


Create a Column Called "DemoCustomer", "DemoSerialNo", "DemoStatus" Make sure you Create them under a separate group where it's easy to filter


Create a Content type, called "DemoDocument", since we are going to use it for Document library, make sure the type of the content type is Document.

Then add site Columns to the Content type.


Now Create a document library, and bind the created content type to that. Once you create the Document library go to the library setting , chose advance settings and allow content type to be bind. 


Then Bind the newly created Content type and remove the General Document content type. 


Then Add sample Documents for demo purpose and Set relevant meta data as follows. 

Let's do some search . If we search "DM-980" you'll see that results will appear as follows. 


SP will give you results which match DM-980 in any field , in this case either "DemoSerialNo" or "DemoCustomer" matches the search term, will appear in results. 

As I mentioned as a 'Note', Crawl properties are automatically created by SP so as a theory we should be able to find a crawl property for a DemoCustomer or DemoSerialNo as both are treat as Site columns.  To find that Let's go the site Settings, click Search schema , under the Site Collection Administration. 


There you can search as Demo where you will get all the Managed properties contain "Demo"


Note: Managed Properties are sometimes automatically created by SharePoint based on the Crawl properties, mapping a specific crawled property to the Managed Property. For example: In the above scenario a Managed Property may be created with a name like "OWSMyColumn" and have a mapping to the "ows_MyColumn" Crawled Property.

~ (https://sharepoint.stackexchange.com/questions/130712/crawled-properties-vs-managed-properties)


In simple words, For us Manage property is the one which can be controlled =. Crawl properties we do not have any control over it . 

Go to the Crawl properties and search "Demo"


You see those are automatically mapped. now If you search something by Crawl Property such as ows_q_TEXT_DemoCustomer then,  you need to use the mapped Manage property name (DemoCustomerOWSTEXT). 


Then you get only the Results which matches only Customer column.  But here you see the issue we cannot as users to remember these odd words such as DemoCustomerOWSTEXT rather We can as them to use DemoCustomer which is more user friendly . so how we can do that.  

The way of doing it, is create a Manage property with a friendly name and mappe it with related Crawl property .  

there are two way of doing it 
1) Through Site collection level (Recommended). 
2) Farm Level

Here will show how it done in both level.  

Site collection Level.  

go to Site settings click Search Schema under Site collection Administration and click New Managed Property.  


Add a friendly name, then select Searchable, Queryable, Retrievable and Safe .

Then click Add mapping to make a mapping with Crawl property. 

Search as Demo to find the required crawl property and make the mapping. 
Save it . 

Farm Level.

Go to Admin Center then select SharePoint.  Under that Go to the Search section. 

Then go to the "Manage Search Schema" where You can do the same as Site collection level as follows.


When you search the Newly added Manage property in Farm level you don't see the Site collection level Properties.  However when you search it in Site Collection level.  you will see the property created in Farm level.  

Farm Level


Site Collection Level


Now it's all done. All you need either wait for few hours by hoping things will index again or you can go to the library setting and chose advance settings then do Re-index 


Show time ...................


Now search as DemoCustomer:DM-980 ... Boom you will get Data which based on customer field. 


Same as for DemoSerialNo 

with KQL you can get data which contain DM-980 as a Custome and as a Serial Number
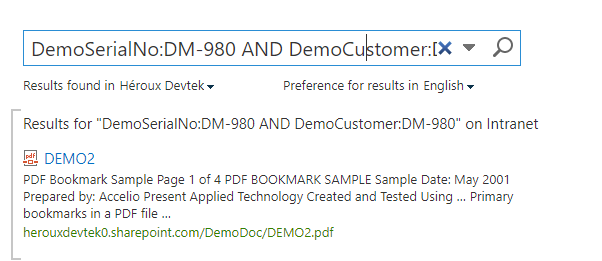


ok That's It ... 
HAPPY CODING

Wednesday, November 1, 2017

SharePoint Online Designer Workflow 2013 : Accessing "People Picker" properties

When we are accessing a out list (A list which is not associated with a Workflow ) which has a people picker and if you need to access it's data properties such as UserName (Name in SP Online terms) or Email or Department. Though it's pretty much straight forward you might mislead by trying to looking to that in REST JSON , or d result angel. it's bit tricky. Anyway before start it's advisable to go through (SharePoint Online Designer Workflow 2013 : Calling REST API & Looping through list items - d results) following article which explains how to get results using REST calls and do the required iteration.

Ok once you finished that article, here are the modification that you must do.

Modification.

a people picker column been added to the same list (UserDetail) called UserID


1) REST call URL
in your REST call url insted of this "/_api/web/lists/getbytitle('UserDetail')/items" which is given commonly access to all items . modified it to "/_api/web/lists/getbytitle('UserDetail')/Items?$select=*,UserID/EMail&$expand=UserID/Id" here you are taking EMail property out separately and  expand the people picker column based on Id, while havving all other columns available "select=*," . it looks like this. yeah looks bit messy.


Let's add this URL to the Workflow

Then let's goto the loop and Add UserID/EMail to the get Dictionery action item. what it dose , it extract the Email from the user object in the People Picker and added to the WF variable.


Now when we run the WF, here is the outcome.


ok That's It ... 
HAPPY CODING

SharePoint Online Designer Workflow 2013 : Calling REST API & Looping through list items - d results

Why ?


One of my colleague was working on a Designer workflow which had been attached to the SharePoint Online portal. based on the requirement, that it is required to access a different list ( not the list which, workflow been associated with ) and extract some data. there were some issues when we were trying to extract information from People picker columns ( After you go through this : go the following Article SharePoint Online Designer Workflow 2013 : Accessing "People Picker" properties ). After we sorted out that ( though it's a simple thing, it took like a day to figured it out ), Got to know that many people struggle in similar kind of situation. This post will explain all the necessary steps  that is required to access a outer list through a Designed workflow.

How ?

With SharePoint 2013 , workflow fabrication been rapidly changed. introducing new feature and mechanism so developers could tackle many issues with new SharePoint 2013 WF manager, which they used to find some workarounds by beating around the bush in traditional SharePoint 2010 WF structure.  One of them is ability to call HTTP web services by supporting of REST API, which enhanced capability to querying list and libraries and returning data objects in JSON ( simply mean d results )


Steps.

This is what we are going to do ....
1) Create a Simple list called "WF Main List" - this is the list that we are going to attach our WF


2) Create a simple list called UserDetail which hold user id and Full Name


3)Create a WF which can called the UserDetail list and get all items then looping though them and add user's Full name to WF history log

Let's begin ....

1- Open SharePoint 2013 designer and add your SharePoint online site, then goto the workflow section and chose list workflow then select the list which you need this WF associate with.  in our case "WF Main List"


Give a name to the workflow like "REST loop testing" and select SharePoint 2013 Workflow (which is default )

This is the first screen your are going to get. Rename the stage with a meaningful name.  (Eg : "Retrieve User Detail")


Let's add a "Set Workflow Variable" action which creates a new String variable called url


Then add REST service called URL Eg "<your site>/_api/web/lists/getbytitle('UserDetail')/items"
Then we need to add a Dictionary variable called "requestHeaders" through "Build a Dictionary action".


Then we should customize the action with following parameters.  

Build the Dictionary by adding both String type entries  "Accept" and "Content-Type". and make sure that value been added as "application/json;odata=verbose". reason behind this that REST API understand this and set response content as JSON


Set out out variable as "requestHeaders"

It's time to call a Web Service action and set its properties. The request will be the url variable


Response content will assigned to a new variable called responseContent (Dictionary type).

Same as responseHeaders and responseCode (String Type)


Then go to the Properties and set Request header as follows
Now let's add separate stage to process retrieved data.


Let's add a "Get an Item from a Dictionary" action and set the item as d/results, and the source as reponseContent, then set output to a new variable of type Dictionary called list.


Then count items from the list variable by adding a "Count Items in Dictionary" action and store the item count in a new Integer variable called count. this will give us logic to define boundaries for the loop to iterate


Then let's define an index variable and set it's initial value as 0 , so we are able to iterate item by using the index variable. 


It's time to add a loop to iterate items.  to do that let's add a loop type called "Loop n Times"
By default looping set to number 1 means one time looping. we need this mechanism to loop for number of item count times.

In the loop we can get value d/results([%Variable:index%]) using a "Get an Item from a Dictionary" action from responseContent and store it in a new Dictionary variable called item. but here is the catch. do not type this in the string builder. first you need to add the Variable index by using workflow variable then do the modification. otherwise you will get some errors when trying to process.

Then we can access list columns by using Get an Item from a Dictionary action make sure that you type the column name as it is with case sensitivity 

Then we can log the item to history


You can concat some string with the variable such as "User Full Name :"

Then we need to make the index increment by 1 till end of looping . in-order to do that we can use "Do Calculation" action

Then we can end the workflow.

Let's Save the workflow and publish it.

Let's do the test by adding an item to "WF main List" and start the workflow. 

Once WF completed we can check the log history


That's it .........  Results are there ... Next post I'm gonna explain some modification to this WF in order to extract information from People picker columns

ok That's It ... 
HAPPY CODING