Thursday, May 31, 2012

Configuring the User Profile Service in SharePoint 2010 {P2}
[User Profile Service Property Map with Active Directory Attributes]


In my previous post I explain, what is call "User profile Service" in SharePoint and what are the advantages and disadvantages, and most importantly "how we can sync it with our Active Directory (AD) " . so I when i publish that post I got some feedback from some of my colleagues. and also they asked one question which I thought it's good to share with you through another post.  


How to map User profile properties with Active Directory attribute ?? Why we need to do that ??


Ok, Let's start with second question. before jump into the technical part. Why we need to map properties with AD attribute. Thing is imagine when you firstly configure and Sync AD with SharePoint user profile service. you can see many of field get map with AD profile attributes. but not all. so then we need to map them again. and sync it. to do that you don't need to delete all service instance and recreate it again. instead of that you can simply map them separately . and another reason is, imagine that you have introduce new attribute to the AD and you hav already Sync AD with User profile service then surely, that newly create attribute has not been mapped with UPS. to overcome these kind of situations you need to know how to map it.  


How To Do That ??


If we need to add more properties and map it with AD fields, so this section Explain the basic steps with required screen attachments.
First Go to Central Administration>Application Management>User Profile Service> then click on Manage User Properties under the People section. 

Then you will See all the fields which currently existing and what are the fields which already mapping with AD Fields.


If you need to add new property and Map it with AD field the click on New Property.


Then Fill the Required Fields. In drop down select the AD field which you need to Map with.


Then clicks on Add, then you can see the filed get mapped.

Once you click ok, You can see the new property got added and you can access it programmatically using its Name (not the display Name).

ok That's It ... 
HAPPY CODING

Sunday, May 13, 2012

Configuring the User Profile Service in SharePoint 2010 
[Sync with Active Directory (AD)]

One of the project which I was assign to asked to to build a web part which shows user details like Title,First Name,Last Name, Dep .. etc. Employee records or data should pull from the Active Directory (So what is this Active directory : Simply, Active Directory (AD) is a directory service created by Microsoft for Windows domain networks.)

To do that couple of approaches came on to the table.

  1. Directly Deal with AD and Get the Data we want by sending some kind of searching mechanism.
  2. Create Time Job and pull all the data from a Active directory and inject them in to a list then using that list we can achieve the task.
  3. Using Profile Service.   


First two options has couple of draw backs.

Option One : Directly deal with AD - sure we can do this but it's a kind of a slow process. and it might hit performance of the Application as well as AD it self. AD has not been designed to work as a efficient Data Base (it's purpose id different).

Option Two: Create Timer Job. - Yes we can do this also and it's a mature process than directly dealing with AD, but we might face some issue with "List View Threshold" Eg: Imagine we got about 7000 records for one searching, if List View Threshold is 5000 (Default) then we might get exception. And to overcome this we had to change the settings for the application (Read more [ How to Change the List View Threshold and Other Resource Throttling Settings]). and this is a little bit pain process and takes time. Even user need to add more properties for the list and map them with Current Ad attribute. then we had to change the things from code level and re run it again.

When you consider on Option Three:  Using User Profile Service, "Yes" it's more Reliable and customization is easy. The most happiest part is it's design to address similar kind of situations which we are talking.

How to Sync ?? 

Go to the Central Administration > Application Management (Left Panel) > Click on Manage Service Application.


Then Click on User Profile Service Application which you are going to sync with Active directory.


There you can see some details as following on the Right Corner . if you see some miner number under the Number of User Profiles, it means that this Service has not been synced with AD.

Profiles
Number of User Profiles
8
Number of User Properties
68
Number of Organization Profiles
1
Number of Organization Properties
15

Audiences
Number of Audiences
1
Uncompiled Audiences
0
Audience Compilation Status
Idle
Audience Compilation Schedule
Every Saturday at 01:00 AM
Last Compilation Time
Ended at 5/5/2012 1:00 AM

Profile Synchronization Settings
Profile Synchronization Status
Current Synchronization Stage
None(0)
Synchronization Schedule (Incremental)
Every day at 01:00 AM


Then Go to the ‘Configure Synchronization Connections’ and Try to add new connection by click on Add New Connection.


If you get error message saying User Profile Synchronizing  service not running Then we have to Up the service.


To Do that Go to the System Settings > Manage Service On Server.


The you will see that User Profile Synchronizing service is in Stop state.

Click on Start then you get following window, give the credential for that, and then click ok. 
Then You will see that service status is changing to “starting”.

Then you have to wait few minutes (it’ll take 5 – 10 min). Till it completed (Once it completed you see status as “Started”).


Then again go to the User Profile Service and click on Configure Synchronization Connections then click on Add New Connection (Now you can see New connection Adding Window will open up [coz service has stared ])


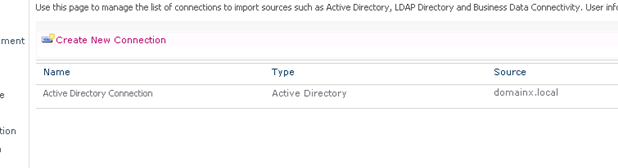
Then Fill Following fields Forest name, Account name, Password.
Onece it done click on Populate Cotainers button the it’ll reach the Active Directory and populate groups and categories.


You can select the categories or Groups which you need to sync (in here I checked domain which sync all the domain records)


Then clicks ok and it’ll take some time to adding the new connection.


Then go to the User Profile Service again and clicks on starts profile synchronization. 
 Then Select Start Full Synchronization clicks ok on new window.


You can see Profile synchronization Status changed into “Synchronizing”
 It’ll take somewhere 10 -15 min to Sync up with AD. After 5 min when you refresh this window you’ll see Number of User Profile Changing (Increasing ).


Once it done go to the Manage User Profile and try to search a user you will get details on that particular person.


This is how we can Sync User Profile Service with Active Directory. 

Next question you might ask from me "How to Deal with User Profile Service in code Level" - no worries guys I'll explain that in my next posts.  


ok That's It ... 
HAPPY CODING


Wednesday, May 2, 2012

Why We need / How to Create - Site Columns in SharePoint 2010
[Site Columns P1]

I was working on a project, It has several lists and each list has a list column called Departments (it's a choose column with meta data). Thing is we need to create this column and feed data into that. so it's a kind of a pain process, specially when you get more than 20 or 30 departments to fill it. and when you mistype column Name of Department names, then you'll end up with exceptions when it comes to the function points.

Why We Need ??

Think about scenario which I explain above. Think if we got a predefined column which include all the Meta Data (Department Names). then all we need to do is add it into the specific list. so the question is do we have a way to do that ? The answer is simple "Yes We have".

Site Columns comes to the picture to overcome these kind of situation.

How To Create ??

Go to the site collection and select site settings through Site Action menu.
Select Site Column under the Gallery section.
click create new column link and, Fill the required Data in which need to project through this column and click "ok".
Then you can see that site column added under the custom group.


Now you need to know how to add this newly Created Site column into the list. First go to the required list and navigate to the list setting section.
(The List which need to add out site column)
Chose "Add from existing site columns" link
then Select custom Group and select out site column and click add and ok it.

Then you can see that column was added into the list. 

Then go to the list and try to edit an item, you can see the chose filed which we added using site column. perfectly functioning wit it's meta data. 

ok That's It ... 
HAPPY CODING

Wednesday, April 25, 2012

How To Upload file Into a SharePoint Document Library
[Upload file programmatically into given folder path ]
(Data Migration P2)


This is directly bind with the previous post (How To Create Folder Structure in SharePoint Document Library) . There I explained that I got a task on Data Migration move file from master file share into SharePoint Site. there i had to consider on two different sub task mainly

  1. How to create folder structure which same as physical path of the file (which I explained in Data Migration P1)
  2. How to upload the required document form file base to that newly created location in the document library (which I'm going to explain in Data Migration P2)

The Requirement ....

Original file : C:\swsetup\SP51083\Vista\example.docx

SharePoint Location :http://talliance.domainx.local:12345/DocLibName/swsetup/SP51083/Vista/


highlighted area represent the directory path which they need to upload the file (I have discussed how to create this inside the document library)
highlighted area represent the document library which they need to upload the file.


How to do that ?? 


For this I have introduce a function which responsible to upload the required file into the correct location.


spServerURL : The URL of the application [Eg: http://myspweb:8000/]

spDocumenttargetUrl :  the name of the document library which you need to upload documents 

folder : location of the doc lib which need to upload our file

FileToUpload : the physical location of the file which need to upload (Eg : C:\swsetup\SP51083\Vista\example.docx)


Overwirte : saying where file should be overwrite, if it existing or leave it as it is.  


public static void CreateSPFile(string spServerURL, string spDocumenttargetUrl, string folder, string fileToUpload, bool overwrite)
        {
            // I suggest skip this pre check since it internally opens a new site object
            // If you have to silenlty ignore non-existant SPSite you should catch a FileNotFoundException.
            if (SPSite.Exists(new Uri(spServerURL)))
            {
                // use the using construct to safely dispose the opened SPSite object
                using (SPSite site = new SPSite(spServerURL))
                {
                    // SPWeb object opened with SPSite.OpenWeb() have to be disposed as well
                    using (SPWeb web = site.OpenWeb())
                    {
                        web.AllowUnsafeUpdates = true;

                        string targetUrl = string.Concat("\\", spDocumenttargetUrl);

                        if (!String.IsNullOrEmpty(folder))
                        {
                            targetUrl = string.Concat(targetUrl + folder);
                        }

                        SPFolder target = web.GetFolder(targetUrl);
                        String fileName = System.IO.Path.GetFileName(fileToUpload);
                        FileStream fileStream = File.OpenRead(fileToUpload);
                        SPFileCollection files = target.Files;
                        target.Files.Add(fileName, fileStream, overwrite);

                    }
                }
            }
        }

Let's Move from Line by Line ....
I'm gonna explain, only the most important lines in this function.

SPWeb web = site.OpenWeb()
web.AllowUnsafeUpdates = true;


when you have a list and if you want to update something, then you need to set AllowUnsafeUpdates = true for the web and the best practice is, after you have done you need to set it back to false. but in here i haven't make it false coz this process going through a massive loop so it'take time and might be crashed. and also "Setting this property to true opens security risks, potentially introducing cross-site scripting vulnerabilities" (by msdn).

string targetUrl = string.Concat("\\", spDocumenttargetUrl);

                        if (!String.IsNullOrEmpty(folder))
                        {
                            targetUrl = string.Concat(targetUrl + folder);
                        }
Crete target folder URL by combining Folder location and document library relative URL
    

String fileName = System.IO.Path.GetFileName(fileToUpload);
                        FileStream fileStream = File.OpenRead(fileToUpload);

Convert the physical file into the data stream which we are going to add into the required location.

SPFileCollection files = target.Files;
Get the file collection on the target location.

target.Files.Add(fileName, fileStream, overwrite);
Add the stream into the required location.


 ok That's It ... 
HAPPY CODING

How To Create Folder Structure in SharePoint Document Library
[File structure which same to the physical path]
(Data Migration P1)

I was assigned for a data migration task in one of a project. in that project client has a aster file based which hold more that 50,000 files like excel doc and pdf. what he need it upload them into the SharePoint site using console application.
requirement is quite complex so in that case I divided it into 3 parts and will share the things which I think that it'll useful for you also.
Why we need folder structure ?? 
this is not just a data migration we need to create folder path which exactly same to the physical  path of the file which required to migrate. please refer the attachment, below to get a better understanding.

when you consider the yellow highlighted area you can see that the physical file path should be same means inside the document library we need to create [Settlement System -> CES Inputs -> 2011 -> Dawn Gas Prices] directory structure.

How to do that ?? 
to do that I have introduce a function which can create this folder structure.

spServerURL : The URL of the application [Eg: http://myspweb:8000/]

spDocumentLibraryName :  the name of the document library which you need to upload documents or create folder path on top of [Eg : Settlement (which highlighted on blue in above picture)

Filepath : physicle file path of the document (Eg : C:\ThilinaLIB\SAMPLES\Cost and Production\5 Minute Meter Data\File Names - AG and MW - Copy (4).xlsx)

Removablepath : path which remove (no use for migration which highlighted in gray color in above picture) [Eg: C:\ThilinaLIB]


public static void CreateFolder(string spServerURL,string spDocumentLibraryName,string FilePath,string Removablepath)
        {

            try
            {
                SPSite _MySite = new SPSite(spServerURL);
                SPWeb _MyWeb = _MySite.OpenWeb();
                // create document lib object which we use for uploading and creating folder paths
                SPDocumentLibrary _MyDocLibrary = (SPDocumentLibrary)_MyWeb.Lists[spDocumentLibraryName];
                SPFolderCollection _MyFolders = _MyWeb.Folders;
                // create folder path which we need to manipulate inside the document library
                FilePath = FilePath.Replace(Removablepath, "");

                char[] directoryCharSeparators = new char[] { Path.DirectorySeparatorChar };
                string mypath = Path.GetDirectoryName(FilePath);
                // Get the folder structure.
                string[] directories = mypath.Split(directoryCharSeparators, StringSplitOptions.RemoveEmptyEntries);
                // cretae document lib path
                string Target = SPUrlUtility.CombineUrl(_MyWeb.ServerRelativeUrl, spDocumentLibraryName);

                foreach (string item in directories)
                {
                    Target = Target + "/" + item;
                    _MyFolders.Add(Target + "/");
                }
                // folder creation is completed in this point
                _MyDocLibrary.Update();
                           }
            catch (Exception ex)
            {
               
                throw ex;
            }
        }

Let's Move from Line by Line ....
SPDocumentLibrary _MyDocLibrary = (SPDocumentLibrary)_MyWeb.Lists[spDocumentLibraryName];
create document library object which we are going to use to create our folder structure.


SPFolderCollection _MyFolders = _MyWeb.Folders;
Take the existing folder collection. which we are using to add our new folders.


FilePath = FilePath.Replace(Removablepath, "");
This is so important. we need to remove some of part form the original file path. Imaging if the file path is like this "C:\TEMP\SP4RK\compmgmt\compadmn\example.xlsx" but we are going to create folder structure in the document library as following "http://talliance.domainx.local:12345/Settlement/SP4RK/compmgmt/compadmn/" so we need to remove "C:\TEMP" part from the original file path.


string mypath = Path.GetDirectoryName(FilePath);
get only directory or Folder path. Eg : if FilePath = "\SP4RK\compmgmt\compadmn\example.xlsx" The myPath would be "\SP4RK\compmgmt\compadmn"


char[] directoryCharSeparators = new char[] { Path.DirectorySeparatorChar };
                // Get the folder structure.
                string[] directories = mypath.Split(directoryCharSeparators, StringSplitOptions.RemoveEmptyEntries);


Use to take directory names in to the string array in a order so it's like directories = { "SP4RK","compmgmt","compadmn" }

string Target = SPUrlUtility.CombineUrl(_MyWeb.ServerRelativeUrl, spDocumentLibraryName);
we need to create target location which we are going to add the folders. it would be "\Settlement"


foreach (string item in directories)
                {
                    Target = Target + "/" + item;
                    _MyFolders.Add(Target + "/");
                }

This is the most important part using this loop we can create folder path one by one. (FYI: keep one thing in your mind you cannot create full folder path at once means to create  "compadmn" folder ,"SP4RK/compmgmt" should exist and do not worry is one folder is already exsiste and it it contain document inside those will remain even you create same folder again )

 _MyDocLibrary.Update();
Finally you should update the document library.


ok That's It ... 
HAPPY CODING